Humpage Technology Ltd
Caliso Temps - Temperature Calibration Software for the 21st CenturyBefore purchasing any temperature calibration instrument, make sure that it will work with Caliso Temps. Please let us know if you require any additions to the devices supported, we're always happy to do our best.
Several years in the making, Caliso Temps is simply the best
temperature calibration software there is.
Caliso Temps, together with suitable instruments, provides exceptional power and
simplicity when it comes to automated temperature calibration.
With Caliso Temps working for you, all of that becomes a thing of the past. Caliso Temps is made up of 2 separate programs:
|
|
1. The Interface
The left-hand panel of the Interface window is the Device Palette that, as you can see, has a number of tabs across the top. Each tab has the name of a temperature calibration equipment manufacturer such as Isotech, ASL, HART Scientific, LabFacility, etc. By clicking on each tab you will see a series of icons which represent the specific instruments supported for each manufacturer. 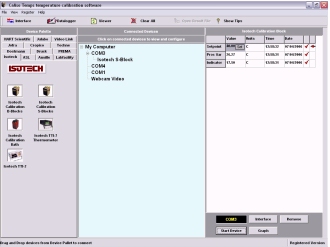
To connect an instrument to a serial port simply select the manufacturer’s tab on the Device Palette and drag and drop the icon of the required instrument on to the serial port on the Connected Devices panel. This is the large central panel of the Interface, and is where you will see listed under "My Computer" all the COM ports and web-cams available for connection. Click the Start button - and that's it, you are now connected. You can have as many instruments as you have serial ports - all running together. |
|
2. Web-Cam Support
Not every piece of temperature equipment is capable of communicating directly with your computer, these will include:
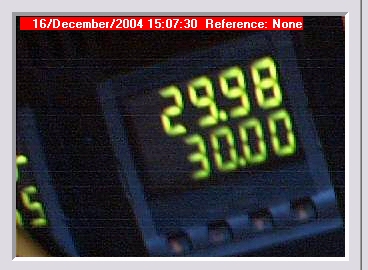
At the end of the test you will have a series of "JPG" images that capture the image of the instrument for each set-point. The temperatures may then be read from these images. In the top left-hand corner of each image you will see a red box that contains the date and time at which the image was captured together with the reference value at stability. |
|
3. Test Setup
Configuring your calibration couldn't be simpler. You just need to set a few parameters including:
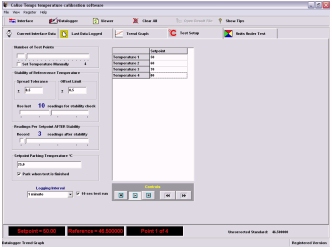
The final step is to specify the location for your run data files. Start the test and you're away. That’s it, you need do no more! The software will now do the rest of the work for you, setting the block to the correct temperatures and recording data values for you. You could sit and watch, and that's what you'll probably do for a while. Then you'll realise that you could be doing something much more useful instead. |
|
4. Run Data
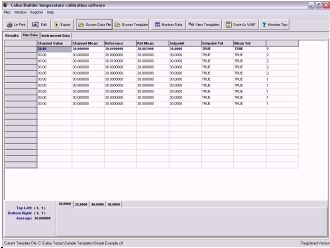
Run data is grouped according to the set-points used in the tests. You will see a spreadsheet-like grid containing data from individual set-points of your test run. Along the bottom you will see a row of tabs indicating the temperature of each individual set-point. Click these to show the data for each of the set-points. 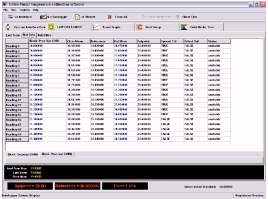
Caliso Temps Laboratory Interface produces two types of data file. The first is a text file, which contains in tab delimited format all of the logged data from the start to the finish of the test. It therefore contains a complete record of the calibration test regardless of any stability criteria that may apply. The file may be exported directly to a word processor or a spreadsheet (such as MS Excel). The second type of file is a CDT (Caliso Temperature Data) file and this is used in Builder to perform calculations of calibration co-efficient and to generate calibration certificates. |
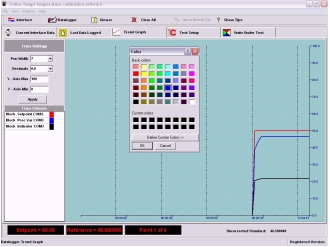
5. Trend Graphs
|
|
6. Creating Calibration Certificates
Whilst some sample templates are included we feel sure that you will enjoy making calibration certificates using Caliso Temps Builder. All the tools needed to produce great looking certificates quickly and easily are here. Your certificate templates can contain several pages, you could, for example, have some pages in portrait and others in landscape, incorporate logos, text and, of course, calibration data. 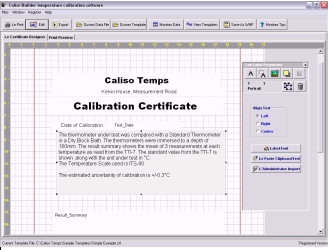
|
|
7. Data Analysis
The Builder’s Data Viewer enables you to turn raw calibration data into calibration information of the following types:
|
|
8. Calibration Certificate – Job done!
Congratulations! You are now about the take the final, and in some ways, simplest step. You have used Caliso Temps Laboratory Interface to set-up an automated temperature calibration, and saved the data in CTD format. You then used Caliso Temps Builder to design a certificate template that exactly matches your requirements, with Data Containers, text and graphics. All that remains to do now is to use all of this to make calibration certificates. 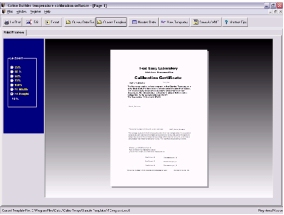
|
Please let us know if you have any problems viewing these videos.
Tutorials:
| 1. Lab Interface: Connecting Equipment | View in mp4 format | View in mov format |
| 2. Lab Interface: Webcam Support | View in mp4 format | View in mov format |
| 3. Lab Interface: Instrument Communications and Data Interface | View in mp4 format | View in mov format |
| 4. Lab Interface: Setting Up and Starting a Test | View in mp4 format | View in mov format |
| 5. Lab Interface: Setpoints and Reference Temperature Stability | View in mp4 format | View in mov format |
| 6. Builder: Designing Calibration Certificate Templates | View in mp4 format | View in mov format |
| 7. Builder: Calculations and Generation of Calibration Certificates | View in mp4 format | View in mov format |